The Oakville Camera Club held an on-the-street and in-the-cold member workshop on time exposures and double image photography Monday night (March 18).
I’m guessing we had 12 or so photographers who turned out despite the very chilly temperatures to learn more about how to do double and time exposures.
First thing you need is a decent tripod. By decent I mean one that actually extends eye height and when it does remains stable. See my earlier post on tripods here.
Next I like to lock down my ISO (the sensitivity of the sensor) so it’s not being adversely affected by car lights or dark buildings. For time exposures I go down as far as it will go which in the case of our Olympus cameras is ISO 80.
Next comes the aperture which I like to set for around f/8 or f/11 depending on the amount of available light and the shutter speed which I want to experiment with starting at 1/30 of a second and working my way down to 3 seconds and maybe more to get those streaks of light.
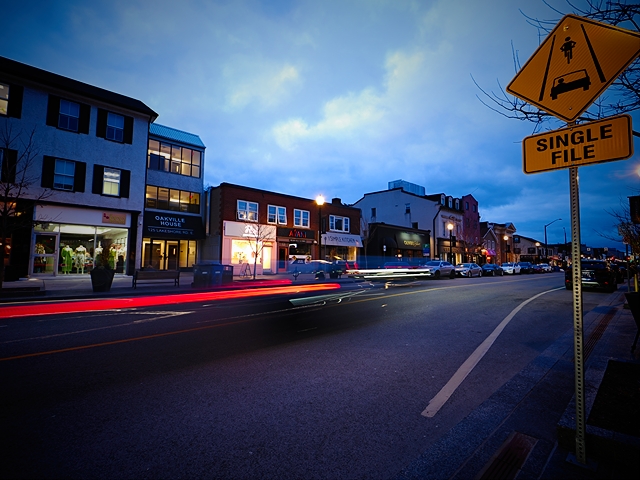
The streaking of light is caused by the tail lights or head lights of vehicles as they enter and leave your image frame. The amount of streaking is determined by how long you’re able to leave your shutter open to record their passing.
Notice I said “how long you’re able”? It’s your aperature and the available light that will affect your ability to set longer or shorter shutter speeds.
In the photo above the actual available light was a lot darker than it appears in the image. This is one of the great advantages of digital photography. Unlike film photography where you really need to know what you’re doing with digital photography you get to check on your rear screen to see if you’re being success or not.
So get out there and experiment with streaking.
Now for double images most digital cameras have a menu item that allows for multiple images. On some cameras you can do more than one double image adding additional images on top of each other and on others you can stack a bunch of images onto the same frame using a simple menu item to make things easier. This is why you need to read your manual.
There are two tricks to this: First you as the artist must find two scenes or two setups (I’m thinking something like multiple images of the same sitter in a portrait or two complimentary landscapes) that will work in a multiple image photograph. And the second is you’re going to have to experiment with your exposure.
If you were to expose both images the same you’d end up the combination of the two exposures and likely see a badly over exposed double image. If you half the exposure of the first shot and half the exposure of the second shot you’d likely end up with one shot with an exposure that looks pretty close to right on.
Now the artist in you might think well how could I shoot a double exposure that has one image more prominent over the other. That’s easy you could expose your primary image at let’s say two-thirds of the correct exposure for a standart image and the second image at one-third.
For double images to look right you should lock down your ISO to the appropriate setting for the scene and the same thing for your aperture as you don’t want either setting changing from one shot to the other. It’s the shutter speed that you can use to balance the exposures so long as you’re shooting images in which nothing is moving.
I can hear someone saying well what would happen if I did shoot something that was moving and my answer is I have no idea but it sounds like it would be a great artistic experiment and I’d encourage you to give it a try.
Thanks to the Oakville Camera Club for arranging this fun night of photography.

Leave a comment